
Introduction
If you are reading this, you are likely staring at your terminal in frustration. You tried to run a simple command that has worked for you for years—pip install pandas or perhaps pip install requests—and instead of seeing the familiar progress bar, you were greeted by a wall of text and a scary red error.
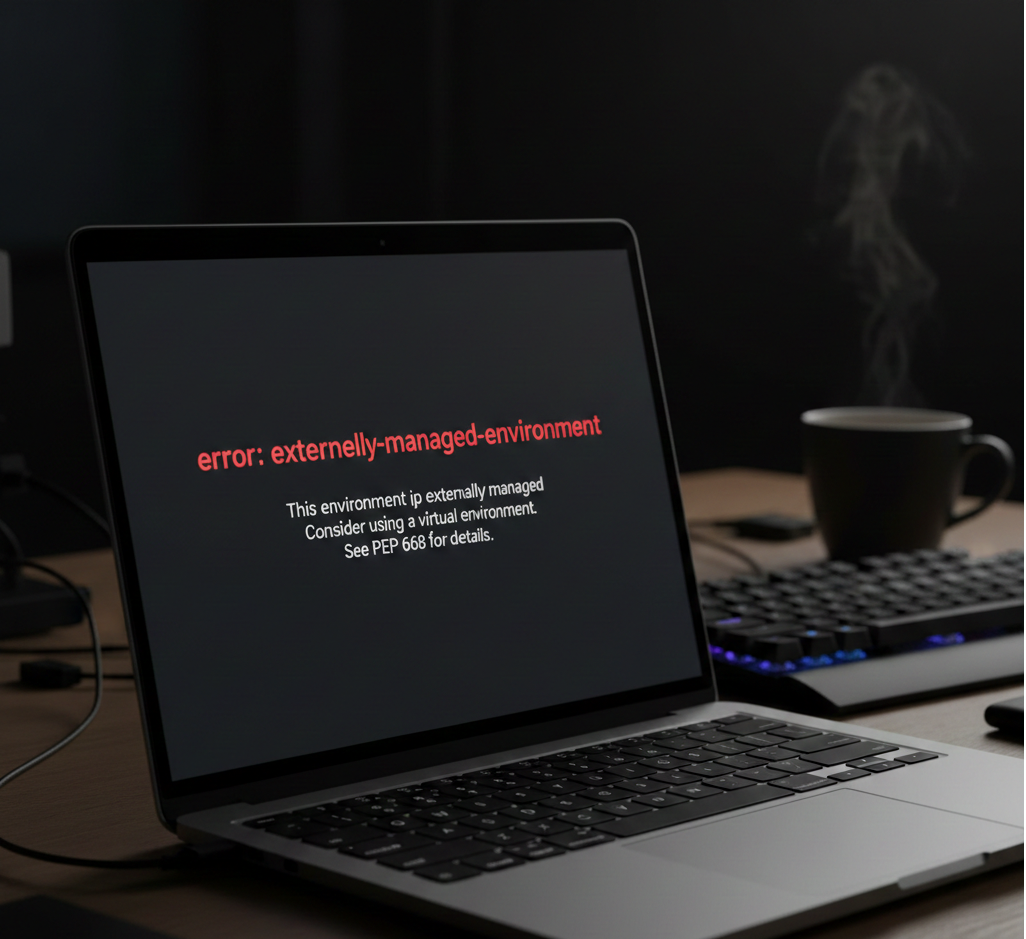
Specifically, you encountered the error externally managed environment.
It probably looked something like this:
Plaintext
error: externally-managed-environment

× This environment is externally managed
╰─> To install Python packages system-wide, try apt install
    python3-xyz, where xyz is the package you are trying to
    install.

    If you wish to install a non-Debian-packaged Python package,
    create a virtual environment using python3 -m venv path/to/venv.
    Then use path/to/venv/bin/python and path/to/venv/bin/pip.

    If you wish to install a non-Debian packaged Python application,
    it may be easiest to use pipx install xyz, which will manage a
    virtual environment for you.

note: If you believe this is a mistake, please contact your Python installation or OS distribution provider. You can override this, at the risk of breaking your Python installation or OS, by passing --break-system-packages.
hint: See PEP 668 for the detailed specification.
Take a deep breath. You haven’t broken your computer, and you aren’t doing anything “wrong” per se. This isn’t a bug; it is a feature.
In recent years, operating system developers (like those behind Debian, Ubuntu, Fedora, and macOS) and the Python maintainers agreed on a new standard called PEP 668. This standard prevents users from accidentally breaking their operating system by installing Python packages globally.
As a Senior Python Developer, I see this issue pop up daily. While it feels like a hurdle, it’s actually a safety rail designed to keep your system stable. In this guide, we will walk through exactly why this is happening and, more importantly, the four methods you can use to fix it and get back to coding.
What Does “This Environment is Externally Managed” Mean?
To understand the fix, you must understand the problem. When you see the message this environment is externally managed, your computer is telling you that the copy of Python you are trying to use belongs to the Operating System (OS), not to you.
In the past, running pip install would place libraries into a global system folder (like /usr/lib/python3.11/site-packages). This seemed convenient, but it led to a massive problem known as “Dependency Hell.”
Here is the scenario:
- Your Linux operating system (e.g., Ubuntu) relies on Python to run critical system tools, like the chaotic terminal interface or network managers.
- The OS expects specific versions of libraries (e.g.,
requests==2.25.1) to ensure those system tools work perfectly. - You come along and run
sudo pip install requests, which upgradesrequeststo version2.31.0globally. - Suddenly, your system tools crash because they aren’t compatible with the new version you just installed.
This conflict is what PEP 668 was designed to stop. By marking the system Python as “externally managed,” the OS is locking the door. It is effectively saying: “I am managing these packages using apt, brew, or dnf. Please do not touch them with pip.”
The error is a protective barrier, preventing pip from overwriting files that your OS package manager controls. So, how do we install packages now? We stop trying to install them globally and start using isolated environments.
Method 1: Use a Virtual Environment (The Best Fix)
If you are developing a Python project, a script, or a web application, this is the gold standard solution. In 2026, using a virtual environment is not just a “best practice”—it is the expected workflow for every Python developer.
A virtual environment is a self-contained directory that contains a specific Python installation for a specific project. When you create virtual environment, you are creating a “bubble.” Inside this bubble, you can install whatever you want, delete whatever you want, and break whatever you want, all without affecting your main operating system or other projects.
Step 1: Create the Virtual Environment
First, navigate to your project folder using your terminal. If you don’t have a project folder yet, create one.
Bash
mkdir my_project
cd my_project
Now, run the following command to generate the environment. We usually name the environment folder .venv (the dot hides it on Linux/Mac) or simply venv.
Bash
python3 -m venv .venv
This command tells Python: “Please create a new, lightweight Python installation inside the folder .venv.”
Step 2: Activate Virtual Environment
Creating the environment isn’t enough; you must enter it. This process is called activation. The command varies slightly depending on your operating system.
For macOS and Linux users:
Bash
source .venv/bin/activate
For Windows users (Command Prompt):
DOS
.venv\Scripts\activate
For Windows users (PowerShell):
PowerShell
.venv\Scripts\Activate.ps1
Once you execute this, look at your terminal prompt. You should see the name of your environment in parentheses, like (.venv) user@computer:~$. This visual cue confirms that you are now inside the bubble.
Step 3: Install Your Packages
Now that the environment is active, the error: externally-managed-environment will disappear. You have full permission to use pip inside this directory.
Bash
pip install pandas requests numpy
When you do this, the files are downloaded into my_project/.venv/lib/python3.x/site-packages rather than your global system folder.
Why This is Better
Using this method solves three problems at once:
- Security: You bypass the PEP 668 error legitimately.
- Isolation: Project A can use
pandasversion 1.0 while Project B usespandasversion 2.0. They will never conflict. - Reproducibility: You can easily generate a
requirements.txtfile (pip freeze > requirements.txt) to share your exact setup with other developers.
Method 2: Use pipx for Global Tools
While virtual environments are perfect for project dependencies (libraries you import in code), they are annoying for command-line tools.
For example, let’s say you want to install black (a code formatter), youtube-dl (a video downloader), or ansible (IT automation). You don’t want to create a new virtual environment every time you want to run youtube-dl in your terminal. You want these tools to be available globally, just like ls or cd.
This is where pipx shines.
pipx creates a virtual environment for every single tool you install, but links the executable to your global path. It bridges the gap between isolation and convenience.
How to Install pipx
You generally install pipx using your system’s package manager (the one managing the “externally managed” environment).
On macOS (via Homebrew):
Bash
brew install pipx
pipx ensurepath
On Ubuntu/Debian:
Bash
sudo apt update
sudo apt install pipx
pipx ensurepath
On Fedora:
Bash
sudo dnf install pipx
pipx ensurepath
Note: The ensurepath command ensures that tools installed by pipx are reachable from your command line.
How to Use pipx
Once installed, you can install Python tools globally without triggering the “externally managed” error.
Bash
# Instead of 'pip install black', use:
pipx install black

# Instead of 'pip install httpie', use:
pipx install httpie
Now you can run black myfile.py from anywhere in your system. pipx handles the messy environment stuff in the background so you don’t have to.
Method 3: The “Break System Packages” Flag (Use with Caution)
Sometimes, you just need to get things done, or you are working in a context where you know safety doesn’t matter as much.
The error message actually gives you a loophole: the pip install break system packages flag.
When you append --break-system-packages to your pip command, you are essentially signing a waiver. You are telling the Python interpreter: “I know this environment is externally managed, and I know I might break system tools. Do it anyway.”
When Should You Use This?
1. Docker Containers: This is the most common valid use case. If you are writing a Dockerfile, you are already in an isolated environment (the container itself). There are no other system tools inside that container that you care about breaking. The container is the virtual environment.
In a Dockerfile, it is acceptable to use:
Dockerfile
RUN pip install --no-cache-dir -r requirements.txt --break-system-packages
2. Throwaway Virtual Machines / CI Pipelines: If you are spinning up a temporary server that will be deleted in 10 minutes, maintaining long-term system stability isn’t a priority.
When Should You AVOID This?
Never run this on your personal laptop (Mac or Linux).
If you run pip install --break-system-packages on your main workstation, you risk overwriting dependencies that your OS relies on. Fixing a broken Python installation on Linux can sometimes require a full OS reinstall. It is simply not worth the risk when venv and pipx exist.
Method 4: Deleting the EXTERNALLY-MANAGED file (The Brute Force Way)
I am including this method for the sake of being comprehensive, but I strongly advise against it unless you are an expert user dealing with a very specific edge case.
The “externally managed” block is enforced by a single file located in your system’s Python directory. If you delete this file, the guardrails vanish, and Python behaves like it did in 2020.
The Procedure
First, you need to locate the file. It is usually found in /usr/lib/python3.x/.
Bash
# Example on a Debian system
ls /usr/lib/python3.11/EXTERNALLY-MANAGED
If you delete or rename this file:
Bash
sudo rm /usr/lib/python3.11/EXTERNALLY-MANAGED
You will instantly be able to run sudo pip install again.
Why You Shouldn’t Do This
Removing this file is like removing the fuse box from your house because a breaker keeps tripping. The breaker trips to prevent a fire; the file exists to prevent system corruption.
If you delete this file, your OS package manager (like apt) may eventually overwrite your changes when it updates, or conversely, your pip installations might break apt. It creates a state of inconsistency that is a nightmare to debug.
Frequently Asked Questions (FAQ)
Why can’t I just use sudo pip install?
In the past, adding sudo gave pip permission to write to system folders. However, under PEP 668, permissions aren’t the issue—policy is. Even with root (administrator) privileges, pip will respect the “externally managed” marker to protect the OS. Using sudo does not bypass this error.
Does this affect Conda users?
Generally, no. Conda manages its own binary packages and environments completely separately from the system Python. If you are using Anaconda or Miniconda, you are already using a form of virtual environment by default. However, if you try to mix pip and conda within the base environment, you might occasionally see conflicts, though usually not this specific PEP 668 error.
I am on Raspberry Pi, what should I do?
Raspberry Pi OS (based on Debian) enforces this strictly. For Raspberry Pi projects, pipx is fantastic for utilities, and virtual environments are essential for coding projects. Do not try to force global installs on a Raspberry Pi, as it can break the GPIO library integrations included with the OS.
Can I just upgrade pip to fix this?
No. This isn’t a problem with an “old” version of pip. In fact, it is the newer versions of pip (23.0+) that respect this standard. Downgrading pip is difficult and not recommended as a solution.
Final Thoughts
The error externally managed environment is a sign of the Python ecosystem maturing. It marks a shift from the “Wild West” days of global package installation to a more disciplined, stable approach using isolated environments.
While it requires a small shift in your muscle memory—typing source .venv/bin/activate before you start working—it ultimately makes you a better developer. It keeps your projects clean, your dependencies organized, and your operating system safe.
If you are setting up a data science environment and face library issues, check our guide on how to fix ModuleNotFoundError: No module named pandas.
If your terminal doesn’t recognize the pip command at all, see our guide on how to fix ‘pip’ is not recognized.
Yorumlar kapalı.