

How to Use the IF Function in Excel (2026 Guide)
Excel is great for crunching numbers, but it becomes truly powerful when it helps you make decisions. One of the most essential tools for this is the IF function.
Think of the IF function like a simple conversation you have with yourself every morning:
“If it is raining, then I will take an umbrella. Otherwise, I will wear sunglasses.”
In Excel, the IF function runs a “logical test” (asking a question). If the answer is True, it does one thing. If the answer is False, it does something else.
Understanding the Syntax
The syntax is just the “grammar” or the specific order in which you have to type the command. For the IF function, it looks like this:
=IF(logical_test, value_if_true, value_if_false)
Here is what those three parts actually mean:
- logical_test: The question you want to ask (e.g., Is the number in cell A1 greater than 10?).
- value_if_true: What Excel should display if the answer is Yes.
- value_if_false: What Excel should display if the answer is No.
Real-World Example: Grading Students
Let’s say you are a teacher. You have a list of student scores, and you need to determine if they Pass or Fail.
The Rule: If a student scores more than 50, they Pass. Otherwise, they Fail.
Here is the data we are working with:
| Row | A (Student) | B (Score) | C (Result) |
| 1 | Name | Score | Status |
| 2 | Alex | 85 | Formula goes here |
| 3 | Sam | 40 | Formula goes here |
| 4 | Jordan | 52 | Formula goes here |
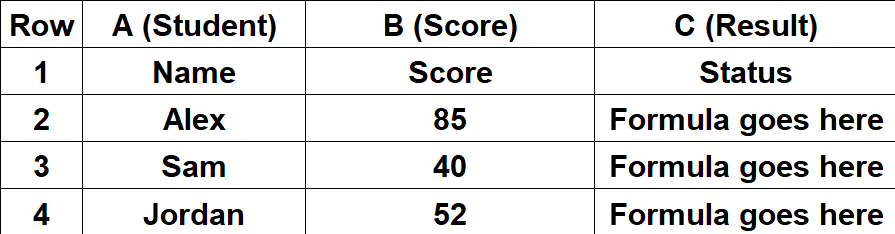
To solve this, we will use this formula in cell C2:
=IF(B2>50, "Pass", "Fail")
Step-by-Step Tutorial
Follow these steps to write your first IF function:
- Select the Cell: Click on cell C2 (where you want the result for Alex).
- Start the Formula: Type
=IF(to begin. - Set the Test: Click on Alex’s score (cell B2) and type
>50. Your formula now looks like:=IF(B2>50. - The “True” Value: Type a comma
,to move to the next part. Type"Pass"(make sure to use double quotes for text). - The “False” Value: Type another comma
,. Type"Fail". - Finish: Type a closing parenthesis
)and hit Enter. - Copy Down: Click the small square in the bottom-right corner of cell C2 and drag it down to C4 to apply it to Sam and Jordan.
The Result:
- Alex (85) > 50? True → Result: Pass
- Sam (40) > 50? False → Result: Fail
Advanced Tip: Nested IFs
What if you have more than two options? For example, what if you need to mark a student as “Excellent”, “Pass”, or “Fail”?
This is where you use a Nested IF. This simply means putting one IF function inside another one.
- Logic: Check if the score is >90 (Excellent). If not, check if it is >50 (Pass). If not, it is a Fail.
- Formula:
=IF(B2>90, "Excellent", IF(B2>50, "Pass", "Fail"))
Conclusion
The IF function is the building block of logical formulas in Excel. Once you understand how to ask a “True or False” question, you can automate almost any decision in your spreadsheets.
Open a blank sheet, type in a few numbers, and try creating your own Pass/Fail test today!
To purchase Office Excel, please CLICK HERE